Beginners Method
Solving a cube has got nothing to do with colors present on the sides of cube all you need is a trick to solve it.
The method present here divides the cube in three layers. You can solve the cube layer by later and not by messing up with pieces and solving only one side.
Before starting with solving the cube lets start with the notations you need to know that are used in the algorithm of the cube.
Below picture will makes things clear to you.

(All the above notation of cube are represented in clockwise rotation.)
Clockwise Rotation:
F - Front
B - Back
R - Right
L - Left
U - Up
D - Down
Anticlockwise Rotation:(with apostrophe)
F' - Front
B' - Back
R' - Right
L' - Left
U' - Up
D' - Down
Step by Step Solution
First Layer
1. White Cross:
How to solve the white pieces in the first layer?
Let's begin with the white face. As we know the center pieces are fixed and so they define the color of each face. This step is easy and you can achieve it by little practice.

Here are few example to solve the white cross.
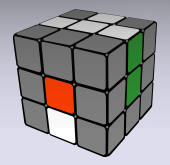
a. Apply this short algorithm when the piece is in the upper front but wrongly placed as shown below.

Algorithm: F R' D' R F2
b. Another situation is when you can't just simply turn the edge.
Algorithm: F' R' D' R F2
Keep practicing the white cross till you don't get it right.
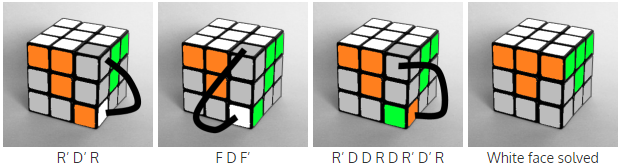
2. White corners:
In this step we will arrange all the white corner pieces in order to finish with the first layer of the cube. once the white cross is done it is easy to fix the white corners. Once the first layer is solved our cube should look like the last image as shown below.

Second Layer
Completing the first layer is not a big deal and is easy to achieve. From second layer to solve correctly we will be using algorithm. In order to solve the second layer there are two alorithms that need to be followed. They are called F2L right and F2L left. Here F2L is First Two Layer.
We just have insert the up-front edge piece from top layer in the middle layer and hereby not messing up with the solved white face.

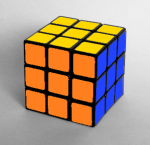
After all the algorithms are applied correctly this what our cube will look like with first and second layer solved completed (F2L completed).
We just have insert the up-front edge piece from top layer in the middle layer and hereby not messing up with the solved white face.
Right and left algorithm
Once the white face is solved place the cube up side down to bring the solved white face downwards as shown below. Now according to the placement of the upfront piece apply the F2L algorithm.

When cube is wrongly oriented we can apply one more algorithm for it.
U R U' R' U' F' U F - U2 - U R U' R' U' F' U F
After all the algorithms are applied correctly this what our cube will look like with first and second layer solved completed (F2L completed).
Third Layer
Now that the F2L is done we are left with the third layer to complete. There are few steps that need to done to complete the third layer of the cube.
Firstly place the cube upside down so that the solved white face is downwards.
1. Yellow Cross
Like white cross, yellow cross is similar in few ways. What we need to accomplish is as below.
 |
| Yellow cross on top |
Just make the yellow cross. It doesn't matter if the pieces are not in their correct place of the sides. Our first gole for the third layer is to form a yellow cross on the top. once the yellow cross is made rest of the pieces can be swapped with few steps.
We can get three possibility on top to form a yellow cross. We need to go through two steps.
 |
| Algorithm: F R U R’ U’ F' |
Besides the solved position there are two other possible patterns: an "L" shaped as illustrated in the picture. In case of the "L" shape you'll have to do the algorithm twice, forming a line. Since the orientation of the cube is important, so the "L" shape is twisted to horizontal line to a cross.
2. Yellow Edges:
After making the yellow cross next step is to put the yellow edge pieces on their correct position. Now switch the front and left yellow edges with this algorithm.
Algorithm: R U R' U R U U R' U
It may happen that you need to apply the algorithm more than once.
 |
| Switch the edges |
3. Solve yellow corners:
:) You can see now only the corners pieces of the last layer are to be swapped. No worries about this orientation. We just have to get them to the right spot.
Find a piece that is already on the right place. Now move it to the right front top corner using the below algorithm.
Algorithm: U R U' L' U R' U' L

Now do this twice to do the inverse rotation. If the yellow corners is on the right place, do the algorithm once to place the piece to the right spot.
 |
| Piece to move |
 |
| Piece after applying the algorithm |
Wooh we are near to solve our cube.
4. Orienting the yellow corners:
Well now that all the pieces are on their right place all are left is to orient the yellow pieces.
So.....
Hold the cube so that the pieces that you want to orient is on the front right top corner, then apply algorithm: R' D R D twice or four times until the piece is oriented at its place.
It may happen that you might mess up, but don't worry.
After the algorithm is applied, make a U' turn move and another yellow piece will come up that you want to orient to the front right top of the cube and flow the same algorithm again.
"Be careful not to move the bottom two layers between the algorithm and never rotate the whole cube"
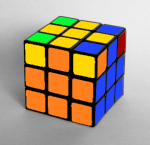
The cube is solved
Awesome.... Was very helpful... Took only 3 mins to solve the whole cube...
ReplyDeleteThat's really great to hear from you.
DeleteThank you.